|
How to discover an asteroid in SkyMorph archive
SkyMorph image archive
You can discover a new uncatalogized asteroid searching CCD images from SkyMorph database.
In order you could find out that this is possible, I wrote this tutorial.
As it works for me, I hope it would work for you too.
The search for new asteroid seems very complicated at first, but at first everything looks complicated ...
We can divide search of images into several steps:
download of images from SkyMorph archive
moving objects identification
search positions from other nights
report the discovery to Minor Planet Center.
Here are internet addresses you need for search:
SkyMorph
images from NEAT archive
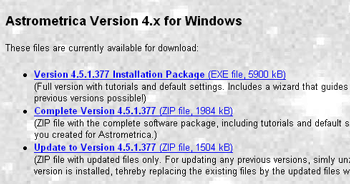
Astrometrica
programm for astrometry work
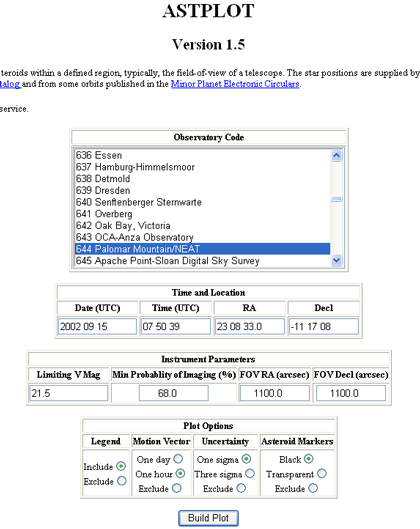
ASTPLOT
gives you positions of minor planets
Find Orb
programm for orbital computation of asteroids
MPEph
ephemerides of asteroids and comets
MPEC
recent MPEC circular
Download of images from Skymorph archive
You can choose from 2 ways how to select images from archive - either by coordinates of specific part of sky
you wish to search by (Position/Time),
or by specific minor planet or comet (Moving Target).

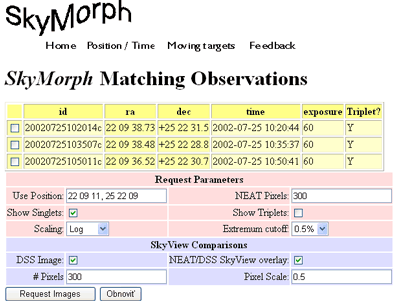
In the first choice SkyMorph returns all images according to selected
coordinates Ra, Dec and time. This search works also in case you choose only one of
them - position or date and time. Time interval is really broad - from 1 second to 1 year.
On the picture bellow you can see the result of search for selected coordinates and date in 1 hour scale.
It returned only 1 triplet of images. When you are searching for images of specific
area of sky or specific dates you should use this tool.
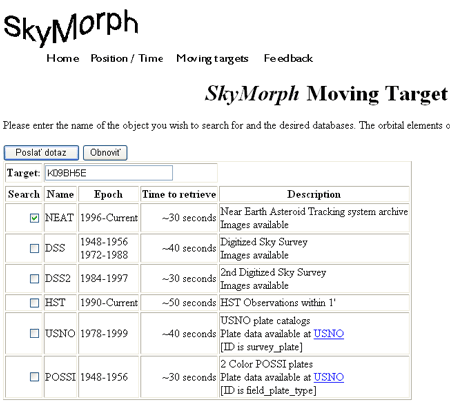
For our aim, to find new asteroid, is better to select images by Moving Target menu item.
Click on it and write into the window Target
any minor planet name, its provisional or permanent designation. SkyMorph
returns list of all images, where required asteroid should be find.
I usually select my search field from recent
MPEC circular, where
lately discovered minor planets are announced. My main criteria for selection are asteroid
observation arc and its absolute brightness (H). Longer observation arc means
more accurate orbital elements and so the computed positions of searched object
on NEAT images are also more accurate.
And the bigger H means also higher chance to see the minor planet on images.
When I found archival images of newly discovered asteroid, I reckon that
it was probably not detected in time of NEAT images aquisition in 2001-2002.
So then it is more likely that beside this specific object, there could be
more unnoticed objects. And that is, what I am looking for!
When you choose recently discovered asteroid for the search, write its designation into empty window
Target. In my example for this article I choosed minor planet
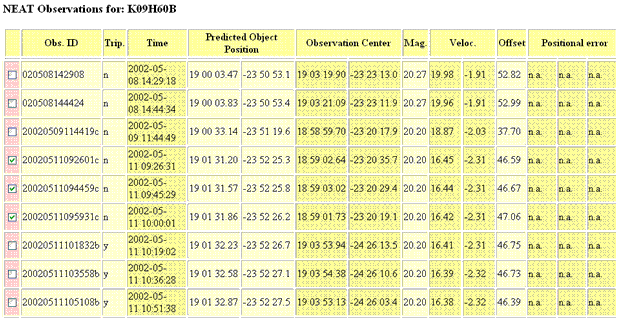
2009 BE175 (in short vesion as K09BH5E). Then in Search column you check from available databases only NEAT database and submit it.
The programm produces list of images where asteroid 2009 BE175 should be found.
Now you select three images taken on same starry field (so called triplet) which
you will review. My first criteria which images to scan, is the brighness of object,
you can see in the column Mag.
I selected images from 2002 May 11, where the minor planet´s brightness was
20.2 magnitude. Depending on seeing at the time when images were taken,
you can find on images objects up to 20,5 mag., but sometimes you can detect
asteroids even at 21th magnitude!
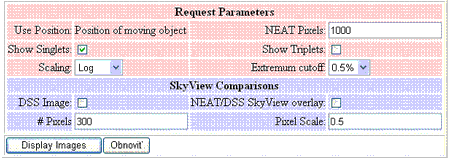
Now you check in left column images you wish to search. In the table
Request parameters you choose the size of
returned images in NEAT pixels box.
I recommend size around 1000 pixels. Check in also a box of Show singlets,
other parameters leave blank and submit it by
Display images.
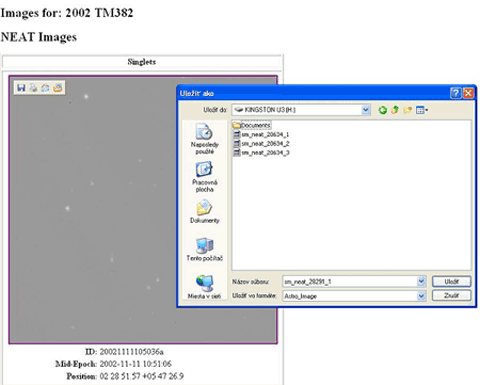
In a while you will see requested images on your PC monitor.
Bigger pictures means longer time for dowloading. Now you download images
by "Save as ..." Images are so called Astro Image type, their endings is "fits".
Your computer save them in this format, unless you have different type of files in your setup for saving.
Moving objects identification
When you have saved images, you can view them and search for
moving objects. I use for this Astrometrica software. It is freeware and
it is fully operational during 100 days. If you find out that it works well for you,
register it. You can download it from this location
Astrometrica
Settings
It is necessary to adjust several specific
parameters in Astrometrica according to you as user. First you will need to change
the configuration file for those observatory and instruments which were used to aquire NEAT images.
There are three different config files: 644. cfg,
608.cfg and 566.cfg.
During the whole NEAT observing period there were taken images from 3 locations with different
setups. To receive precise measurements you have to use correct config file
according to viewed images!
You can download config files from here:
566
608
644
How can you recognize which images belongs to which observatory?
566 - all images before 2000 December (Haleakala)
608 - images after 2001 February (Haleakala)
644 - all images ends with letters a,b and c (Palomar).
In my example I choosed triplet from 2002 May 11 from the produced list with asteroid 2009 BE175. There you can see
letter "c" in images ID, which means that those images are from Palomar Observatory (644) and accordingly
we use config file 644.cfg.
Exposures of images taken before 2000 December were usualy 20 seconds and there is
limited magnitude about 19. So if searched object is 20th magn. or even dimmer, you could
not find it. You should skip Images from Haleakala (608) taken after 2001 February is better to skip.
You would hardly identify moving objects there, unless you are an experienced "hunter" as
these images quality is poor. It requires a lot of practise. Exposures were also
20 second, so you can go down only to 19 mag., not deeper. The best for searching are pictures from
Palomar observatory (644). In those images you can easily identify objects to 20.0-20.5 magnitude.
as their exposures were 60 seconds.
On opening of Astrometrica you will see this question first:

Answer
Yes at first time and than everytime you do not need
your older measurements anymore. When you say Yes, software opens a new MPCReport file.
This way you may lose all your previous measurements. So otherwise your answer
should be No!
First step after you open Astrometrica is select the right config file. In our example
as we have images from observatory 644, we choose 644.cfg by click on Settings in the File menu
or just simply click on first icon in the header menu and open this specific configuration file.
As you will send astrometry of your discoveries to the MPC, you have to add your
name and contact into the configuration file!
Fill these in Observing Site, Details: write your name, contact, e-mail address and
in the Measurer row write your name as follows: first name as a first letter and than your family name.
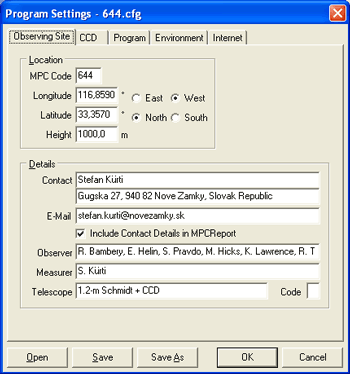
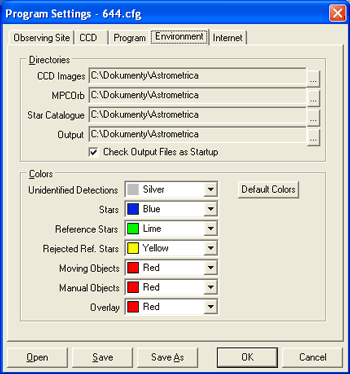
You have to adjust some data in Enviroment section too. Specify the route in your PC where
you store the Astrometrica programm, in order that Astrometrica can find the way to needed data during work.
Save your corrected config file and use it in this form.
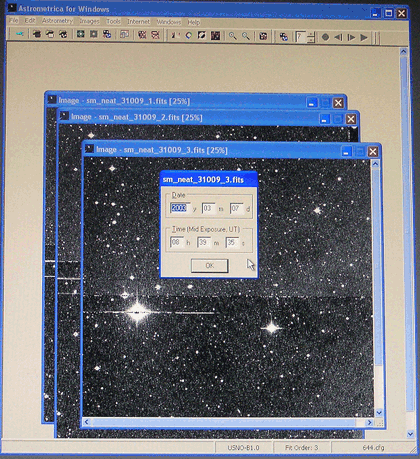
After your settings were done, upload your triplet to be viewed - via
File - Load images.
Find your images saved from NEAT archive and click on them.
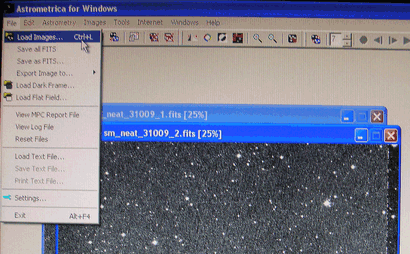
When you upload an image, a new window opens on your screen.
Fill the time and date when images were taken. Be careful -
should write the middle of image aquisition´ time, not a start! In returned list
of SkyMorph images you find this in column
Time.
Data Reduction
After images were uploaded, next step is matching starry field from images with the star catalog.
In this step Astrometrica create a "grid" for RA and Dec and find reference stars.
This is very important step - only when you have correct adjustment, you can measure exactly.
In astrometry work, this is essential!
In second menu row Astronomy click on
Data Reduction, or simply use the shortcut by
CTRL+A and then you will see a new window
for coordinates input (RA a Dec) of searched CCD images.
In the list you will find these in rows
Predicted Object Position.
You fill in both coordinates and click OK. Astrometrica checks now reference stars.
In case you filled wrong data, Astrometrica could not find correct reference stars,
so it matches them incorrectly. After this step in table Data
Reductions Results look at Fit order.
You need Fit Order = 3!
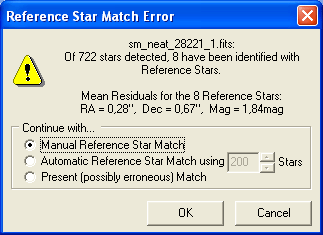
Sometimes coordinates are shifted and Astrometrica could not find reference stars.
In such a case a table Reference Star Match Error
will occur.
You can solve this in 3 ways. When you use first -
Manual Reference Star Match, you can move reference stars
by your own in a correct direction and match stars on your images with reference stars
mechanically. But before you do this, I recommend to take second choice first -
Automatic Reference Star Match using.
And only after that would not help, then try to match stars manualy. To accept
the third possibilty means to accept erroneus match, which I do not recommend at all.
You will have wrong reference stars and so your measurements are wrong too ...
Let´s assume your data reduction process ran OK with required Fit Order value,
so in a moment Data Reduction Result table with Fit Order = 3
appears. Now you close this window and finally start your search.
Now you just click with mouse on selected object and a new window Object verification,
opens where you can see information of selected object.
Images review
Select in the ASTROMETRICA menu bar in the upper row
Tools item and click on
Blink Images, or use the shortcut
CTRL+B.
You can change the speed of blinkage in range
1-10. You will find which speed allows you to detect moving object most conveniently.
In second row of menu bar find
Blink Frequency button, by which you can
change the speed of blinking - just moving up or down the arrow.
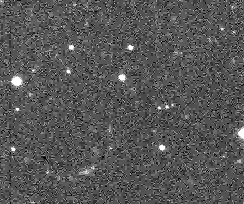
Watch images as they appear on your screen and look for moving object against the starry background.
Astrometrica has an automatic identification of moving objects (6th icon in menu bar
- Moving Object Detection), but don´t use it! Better to rely on your eyes. At the start it will
not be easy to catch the moving objects, later, after some practise, it will be easy.
Automatic identification is so "perfect", that on image where
are just a few real moving object, he would "detect" tens of them ....
When you catch a moving object, measure its positions by clicking on it on all three pictures.
When you click on moving object and Object verification window opens, you
have to name it on the bottom of opened window. You can assign your "discovery"
by 6 digits code. I name my objects as a krtxxx,
where last three characters is the sequence number of object I am searching.
After you named your object, click on Accept button.
This way review whole image and measure all detected objects.
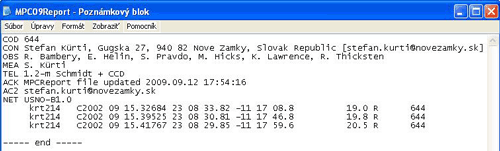
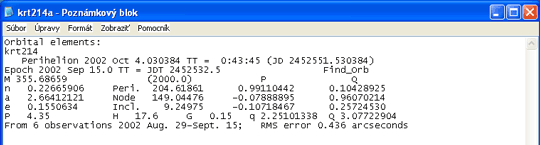
Positions of measured objects are stored in the MPCReport file, which you
can open via menu bar in Files
View MPC Report File.
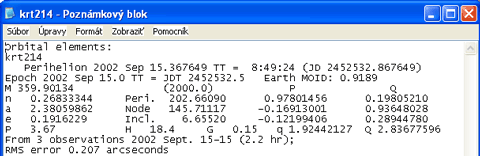
In the picture below you can see MPCReport with measured positions of object named as krt214.
In next step you have to find out whether your discovery belongs to known or
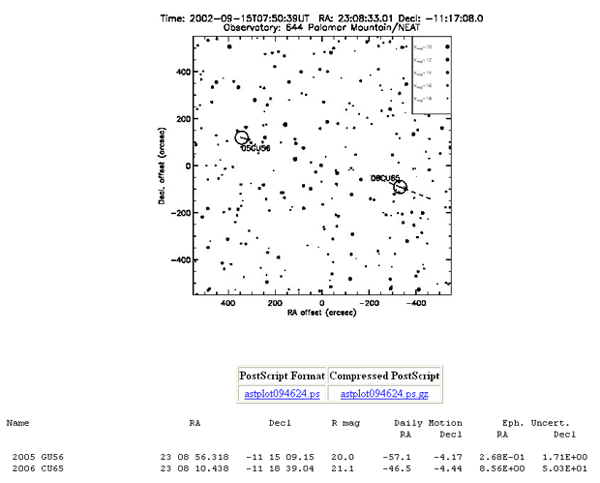
unknown objects. For this I use ASTPLOT, the on-line service of Lowell Observatory.
When you enter coordinates of your object from MPCReport, ASTPLOT draws a plot of specified
starry field with positions of all known asteroids and comet within specified area.
When there is minor planet in the middle of the chart, that means you measured
positions of already known asteroid. Otherwise (when nothing showed up in the centre)
you probably found something new!
The chart with asteroids in the field of our example of krt214 shows, that it could be a new object
- in the centre of chart there is nothing!
Now you have to prove that your "discovery" is a real object and you did not measured
something which is already known or did not exist at all. It means to find more positions
from other nights. This is the most difficult part of your whole work!
Search of additional night positions
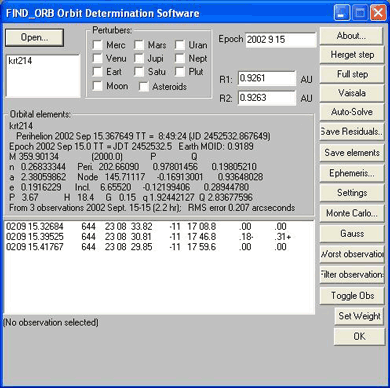
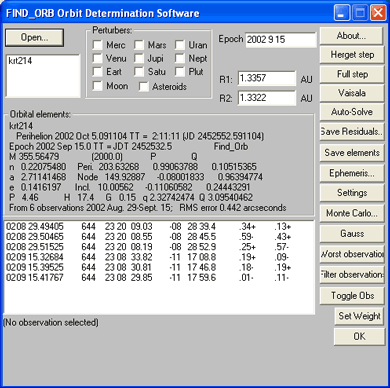
It this part of your work you need to determine orbital elements of your object.
I recommend for this purpose
Find Orb. This programm compute
orbital elements based on your measurements in Astrometrica.
Open the programm, click on Open and upload your MPCReport.txt.
It shows you all your data. In our example there you see positions of krt214.
Now click on krt214 and all positions shows in a window below. As your positions
cover just a very short observational arc 30-60 minutes,
to receive preliminary orbit you have to use Vaisala method of determination. Click
on Vaisala button
and you will get the preliminary orbit. Save the computation result with the same name as you named your object -
e.g. krt214.txt - by clicking on Save elements.
How will you know whether your measurements are precise? The value of RMS error
tells you more about this. So called mean error - RMS error - should be less than number 1! When it is higher, you did something wrong.
It could be caused by incorrect reference stars, or you took for moving object something that was not exist at all.
It could be a cosmic ray, electronic noise on images, or perhaps a star.
Note:
minor planets moves according
to physical laws, which means in this case straight movement at constant speed.
When you determined an orbital elements, return back to the SkyMorph and open
Moving Target. This time you wil not write anything in Target box!
As you are searching for a new object, it could not be in MPC database ...
Instead of it you will input your computed Orbital elements.
You fill item by item as follows:
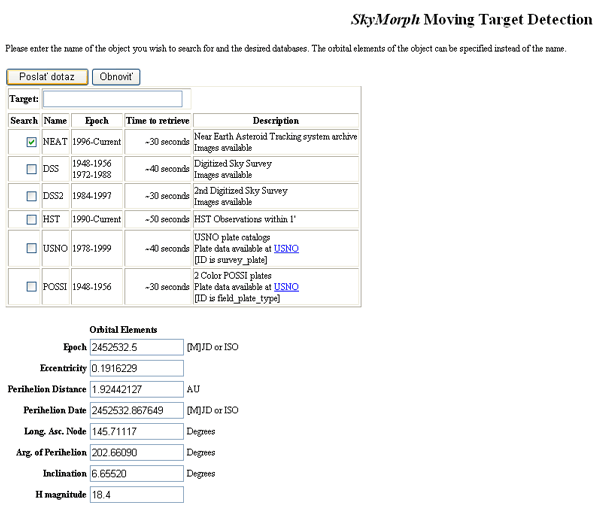
Epoch - epoch of observation in Julian data
Eccentricity - e
Perihelion Distance - q
Perihelion Date - Perihelion - date in Julian date
Long. Asc. Node - Node
Arg. of Perihelion - Peri
Inclination - Incl.
H magnitude - H
Be careful with sign in front of decimal numbers - it is dot, not a comma! When you input
all data submit them.
SkyMorph returns a new list. Now you can check whether your present step was correct.
When on this list is also your "discovery" triplet, it verifies
and proves that you are on good track. In our example it is OK. Images from 2002 Sept. 15 are on the list!
I marked them with red circles in the picture. But you should check also exposures times too -
they should be the same too! In other case, you are on the wrong way ...
From newly received list choose another triplet for reviewing
as close to the first date as possible.
It does not depend whether selected images are after or before it. Choose the nearest one.
Search among images from Palomar observatory (644) and of course keep your eyes
also on the predicted brightness of the object.
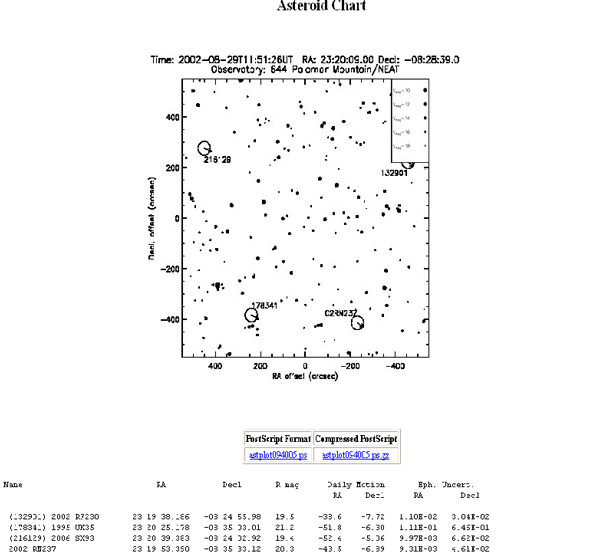
Select your triplet. In our example there are shown two triplets - 6 images from 2002 Aug. 29,
from the same date, but different star fields. You have to select images from the same triplet!
You learn out which three is from the same one by columns Observation Center. Here
are stated coordinates of images centres, do not slip those with computed coordinates
of searching object! I marked the triplet with blue circles.
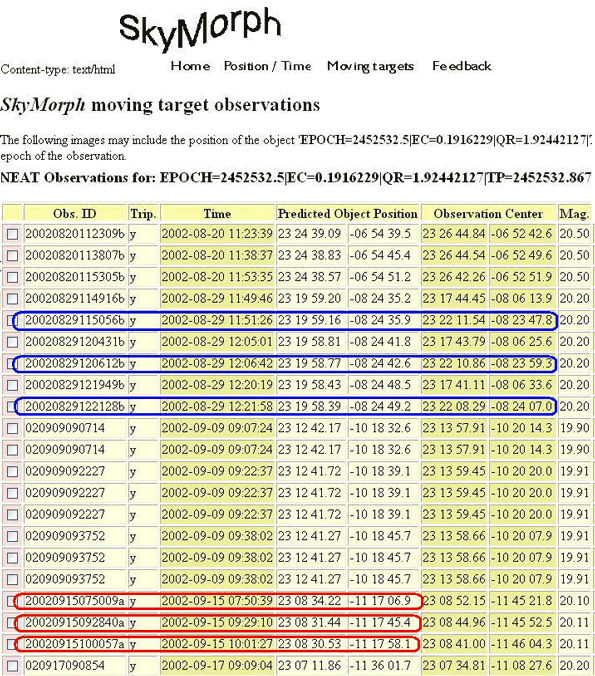
Now you check in all three boxes in rows of selected images on the list´s left side
and download them. Again open ASTPLOT and input computed positions
of searched object to draw a new chart. When I put
krt214 positions to ASTPLOT, there is nothing in the centre of the field and that is a good sign.
Next step you already know - data reduction. When it is done, you can review
images for moving object near the computed position which are in columns
Predicted Object
Position of returned SkyMorph list.
You drop out all known asteroids plotted on the chart, you can see there also their coordinates.
Your object should be near the computed position and as bright as it is writen in
SkyMorph list. Surely not brigher or dimmer of 1-2 magnitudes. Direction and
velocity must be also similar to the first night observations. When there are more
unknown moving objects near the assumed position of your "discovery", you need to examine all of them.
Measure them and you will learn out the right one after new orbital determination.
But be careful! You have to name the object with identical name as at first night.
In case there are more new objects, as first, choose the most prospective from them -
with the similar movement and brightness. Mark it again as "krt214".
Other objects name e.g. as krt214a, krt214b, ...
Now you have two night observations. Return to the Find Orb and compute new elements
based on two night observations. In case you have not found the correct object, go back
to MPCReport, rename next object krt214a to krt214 and repeat computation as long as you
detect the object you are looking for.
Let´s assume you found the right object and now you have its positions from 2 nights.
Upload the actual MPCReport in Find Orb, where you can see 6 rows of measured positions now.
Check in in Perturbers presets all objects and this time you will use for new computation
Auto Solve button. If you measured positions of the same object from both nights,
RMS error would change just a little, no matter which way. When it arise much,
that means that your positions are not from the same object.
Higher value of RMS error than 0.8 tells you that you are on the wrong way. Perhaps you found
position of another uncatalogized object... Later it could be your next searched target.
When new RMS is close to previous RMS rate, you found probably second night positions! Well done.
Save your orbital elements and go back to SkyMorph.
Just repeat already learned steps - input new elemnets and select another triplet
from new list of images. Though on previous list there were more images
to search, do your third night selection from a new computed list!
In our example there are images from Mt. Palomar observatory (644)- besides of 2002 Aug.
29 and 20, use for selection
based on 2 days orbital elements. Reason for doing this way is simple - orbital
solution based on two nights is better and should returned more accurate positions of hunting object.
Repeat these steps until you check every possible images. More observation nights,
more precise orbital elements and so more accurate predicted positions in SkyMorph list.
If there are no additional images you could search, it´s the time to send your
discovery to Minor Planet Center.(MPC).
Sending observations to Minor Planet Center
In order to receive a provisional designation for your discovery from MPC, you should
send observations at least from two nights, but prefer 3-nights! It is not two-three following nights,
it means three different nights, although 3 following nights is OK. You can submit discovery from 2 nights
too, you can even receive a provisional designation for such an object. When MPC
has in their archive another positions for submitted object and those cover
longer observed arc, you lost your discovery credit.
So instead of discovery you just sent follow up observations for other observer.
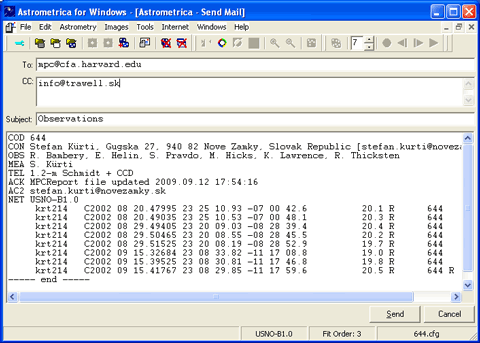
Be careful with your e-mail form. In case your filled the settings in Astrometrica correctly,
you can use its form to send your report to MPC.
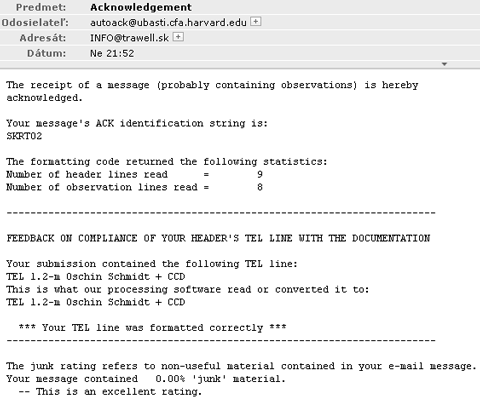
Chcek your MPCreport and simple post it. After sending it, you will receive
so called Acknowledgment, where you can read how many observations did you sent.
In order to send a proper e-mail, read the Guide of MPC - linkage I mention on the buttom of this page.
Usualy you receive answer about your observation from MPC in 24 hours .
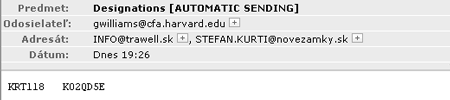
When it is a really new and uncatalogized asteroid, you will receive a message called "Designation",
where privisional nuumber of your discovery is stated. The e-mail in our example shows
that for object I sent to MPC as KRT118 was named as K02QD5E (short version), or
as 2002 QE135 in other form.
If you received message like that on the next picture, that means that
you measured precovery positions of already known object... Left bracket means already known asteroid.
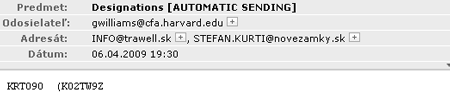
Positions of KRT090 I reckoned as a new, but they were finally positions of minor planet 2002 TZ329.
Its orbital elements were so inaccurate, that ASTPLOT did not show this asteroid on the position
I detected it. In this case I submitted furhter data which extended observation arc
and so this way I helped to improve orbital elements of minor planet.
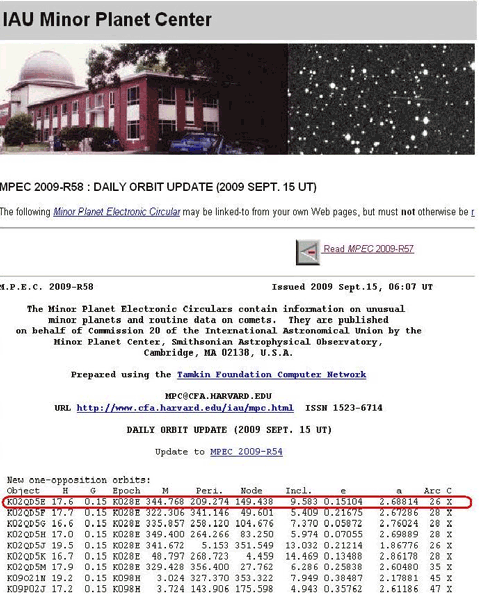
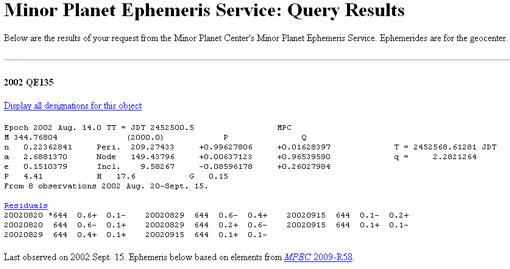
In following days your discovery is published in
Daily Orbit
Update (DOU) which you can see on MPC web page. Our example discovery of 2002 QE135
is in DOU listed between New-one opposition orbits.
Thereafter a new asteroid is added to catalogue and you can check your discovery at
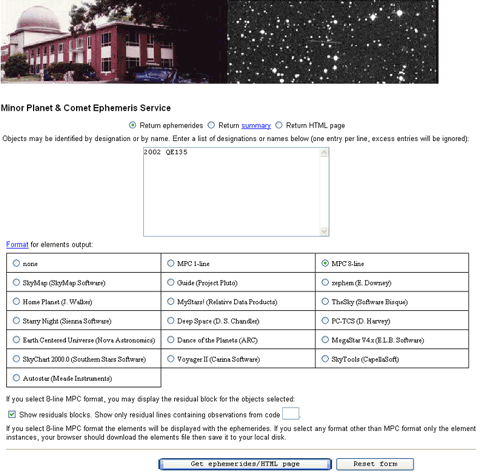
Minor Planet & Comet Ephemeris Service.
Write in the window the desigation of your asteroid.
Then go down a little, check in the MPC-8 line
and as a third you check in a box of Show residuals blocks.
Now click on Get ephemeris/HTML and you will see soon orbital elements of your discovery
together with all observations listed in MPC of this minor planet.
This way you can follow your discovery from very first positions as far as it will
be numbered and even beyond.
In this moment your discovery process is at an end. Your minor planet now requires
follow up observations to refine its orbital solution up to the stage when it is
ready to be labeled with permanent number.
This period, started with provisional designation and ended by permanent number would last
usually several years. But for you as for a discoverer, this process is over,
untill you have big enough telescope with sensitive CCD camera to follow up your discovery.
Further observations will obtain professionals during their surveys. But to name
your discovery is still a long way to go...
As I mentioned at the beginning, work with SkyMorph archive is quite difficult,
and if you carried your reading up to this point,
you can still agree with my statement. But after you learned these several steps,
you would work easily. The shortest time I made a 3 nights discovery was about
30 minutes, but usually it takes much longer. Sometimes I am unable to find
additional positions. The misfortune is, that there are no suitable images in
archive, otherwise I would find them ... I cannot choose but put "discovery"
ad acta and start new search.
Searching in archival data is a great fun and delight for me, especially
when I can add another new asteroid to my discovery list. Likewise I enjoy
following how new observations are added. Furhtermore after every lunation
it´s a big thrill whether some of mine minor planet is assigned with permanent number
or even named ...
At the end I would like to mention that before you start your SkyMorph search,
do a little homework first and read carefully Guide of IAU about astrometry work:
"Guide to Minor Body Astrometry".
And I can recommend you further reading of Marco Langbroek´s
Guide to using SkyMorph, which was my handbook
when I started this work.
In case that such a complicated work does not discourage you and you are venture for
your own hunt, I am ready to help you. Just contact me
--->>> here!
Good hunt and enjoy it!
|